You win some, and you lose some, generally. I have been putting my Dresden plates together to make a Linus quilt, and am quite pleased with the result. I wanted to put corner squares of pink, to link it all together, but didn't have enough. I had the bright idea of making a four-patch for each corner instead, which saves fabric and gives a similar effect. When it's been quilted I'll probably bind it with the yellow.

Then at our Flutterwheels meeting, I was inspired by Chris's gorgeous January wall-hanging. She had made it by following some instructions by Kandy Newton on the British Quilt List. Kandy has posted a challenge for the last few years, and this one is to make a perpetual calendar. I decided that for me, January was a dull, grey month, with some frost and silvery sparlke, and a bit of sitting by the fireside.
 I have embellished it with beads and sequins to get a frosty look, although they aren't too evident in this photo. If anyone fancies a go, you have to join Yahoo Groups, and BQL, but the instructions are freely available. There are going to be different projects for each month's calendar page.
So far, so good. Then I tackled a charity bag which Nik has designed for our local Leukemia shop to sell. She gave out free kits and patterns at the last meeting of Rocheberie Quilters. Here is my finished bag.
Looks OK, until you look on the other side
 which is inside out! This is what you get for leaving things to the last minute! Luckily DD has unpicked it for me, so it'll only take a few minutes to resew. Never mind - you can't be perfect all the time!
 It's lovely and bright, so perfect for teenage Linus quilts, but why, oh why do they make panels with 8 blocks? And the border strips (there was one on each side) are never enough to do anything with, either. Then I had an idea. Maybe the border strips would be enough for a central block, bringing the total to a very useable nine.
  I dug out my Dresden Plate ruler, and cut wedges from the border. There wasn't enough fabric for my purpose, but I managed to find some fabric in my stash which fitted the bill.
 Here is a Dresden Plate which turned out pretty well - the yellow circle in the centre hides a multitude of sins, thank goodness!


 For Middle England, this is serious snow! If you want to look at some decent photos of the snow (definitely no cow's ears etc) then
  Then I finally made up November's block for our challenge group, Flutterwheels. Last year's theme was stars, and the last block was Jennie Rayment's 'Star Flower'. Jennie is famous for her fabric manipulation, and very clear instructions, although that didn't make me less apprehensive about tackling this block.
 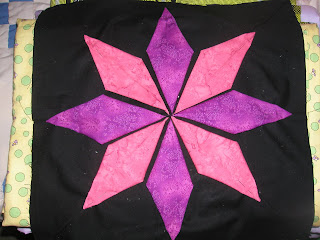 The brief was to use analogous clours (colours next to each other on the colour wheel) and I chose red (in this case, pink) and red/purple. I still need to sew the ends of the petals down, but it's looking OK so far.


 Turn the ray right sides out, poking the point out well with a pencil or something which is not a scissor point or you'll make a hole, like I did!
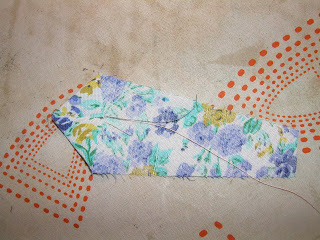 Now press! Join them together matching the sides of the rays, until you have made a circle. It depends on the size of the ray as to how many you need. (Mine were quite small and needed 24 rays for a circle.) Lay the plate onto a square of backing fabric and applique down by hand or machine. Applique a circle in the middle to hide all the mess in the centre. Easy! Now I just need to join up 72 more and I'm in business!