Thanks to Jane's excellent suggestion, not only have I got a nice, gutsy border for my Dog Show quilt, but I didn't have to go and buy any! (No, I didn't steal it, and neither did Jane give it to me - generous as she is!) She suggested a piano keys border using the fabrics I had used for the dogs themselves. What a great idea. I didn't have enough of all the fabrics (as ever) but I think it works well.

 Here is Aussiedog, made from fabulous Australian fabric.
 This is Pointer, who is so interested in something, his head has nearly left his body!

 And now to label the rest!

I have decided to label all the breeds, because I'm not sure whether everyone will be familiar with them.
This is Robodog. (He was actually the first one I made, and turned out a little chunky!)
 Here is Aussiedog, made from fabulous Australian fabric.
 This is Pointer, who is so interested in something, his head has nearly left his body!
And here is Stripedog, a bit of a throwback from the hippie era, with his purple coat.
 And now to label the rest!
 And here they are after their transformation.
 Rather similar, you'll agree. Apart from a few which have gone green, and others which have turned grey (both reactions which I think I would have emulated, had I been immersed in a bleach solution!) the majority of fabrics look the same. I suppose it's a matter of trial and error, and it was worth a go, but I think some of them will be finding themselves in my charity rags bag in the near future - there's only so much brown a girl can hide in a scrap quilt!
 I wish I hadn't used beige as my background, but it was an experiment (making dogs, not using beige!) and has turned out pretty well, overall. The dogs are all different breeds, from the pale green Robodog (bottom left), the Tartandog (top right), Bonedog (just under the WOOF) and the Stringdog (easy to find!) I think a cat has even sneaked in there too! Now I need to find something gutsy for a border.
 Here are my blocks ready to go. I chose a fabulous novelty fabric with flappers on it and a green batik. Most people seem to have printed their signatures by computer, but I wanted quick, so I have written them by free machining. I chose a fairly firm fabric for the cream and startched it before I machined it to eliminate pucker. Hope people like them.


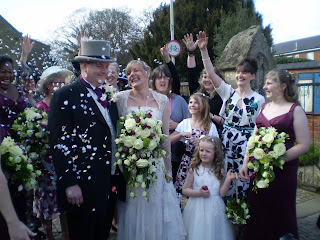
 and here are DH, DD and myself in our wedding finery, standing in the churchyard just before we head off to the reception!
 and then realised that there were quite a lot of component parts in my 'little blocks' box. This is where I put all the leftover half square triangles, four-patches and anything which has been joined together, but isn't yet a block. I was able to save myself a lot of time and cutting, as there are quite a few half square triangles needed for this design. I quickly got half way.
  Then I was on a roll. With the end in sight and so many components all ready to use, it was very straightforward. Here is the completed top.